Okay, so this thing’s been all over my feed. A thick chocolate shell, pistachio cream inside, and that loud CRACK when they cut into it. I watched one video, then five more. Finally thought, “Alright. I’ve got to learn how to make Dubai chocolate bar at home.”
Turns out, it’s not complicated. But it is easy to mess up if you don’t know what matters. Like how long to toast the kataifi. Or why pistachio cream works and pistachio paste doesn’t.
This recipe is simple. Toasted kataifi. Sweet pistachio cream. A chocolate shell that actually holds up. I’m walking you through the whole thing. What to use, what to skip, and why the little steps matter. No fluff. Just a solid dessert you can break open and actually enjoy.
Let’s get into it.
Table of Contents
What IS the Dubai Chocolate Bar? The Story Behind the Hype
The Dubai chocolate bar didn’t just show up out of nowhere. It came straight from Fix Dessert Chocolatier, a dessert shop in Dubai that knows what it’s doing. The bar was created by Sarah Hamouda, and the official name is Can’t Get Knafeh of It. Pretty fitting, since it’s built on the same flavors as knafeh, a traditional Middle Eastern dessert.
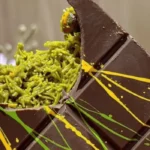
At its core, it’s simple. Toasted kataifi (that’s shredded phyllo) mixed into a soft pistachio filling, tucked into a thick chocolate shell. No smoke and mirrors. Just ingredients that work well together. The crunchy-sweet combo got people talking, and then sharing, and then trying to make it at home.
That’s where this recipe comes in. You’re not reinventing anything.
The Essential Ingredients: A Closer Look
Alright. Before you do anything, here’s what I used in my own kitchen.
I’m not a professional baker. I’m just a guy who wanted to make that TikTok chocolate bar without it turning into a mess. So I grabbed a few things, made a few mistakes, and figured out which stuff actually worked.
This isn’t me trying to impress anyone. It’s just what made sense after a few rounds of, “Nope, that’s not it.”
The Chocolate: Choosing the Right Kind for the Perfect “Snap”
Good chocolate makes all the difference. I’m not talking about chips from the baking aisle. Those are made to not melt, which is the opposite of what we want here.
I use a mix. About sixty percent dark chocolate, forty percent milk. It gives the bar enough richness to stand up to the filling without being too sweet. If you’re tempering, skip the cheap chocolate. I’ve tried it. It melted weird, stayed soft, and just kind of sat there like, “what now?” You want the kind that melts easy and sets up with a clean break when you bite it.
 1")
The Pistachio Puzzle: Cream vs. Butter
This part? This is where I messed up the first time. Thought pistachio butter was the same thing. It’s not!
That stuff is just straight nuts, no sugar, no flavor. My filling turned out dry and kinda sour. Not even close to what I was going for.
What you want is pistachio cream. It’s sweet. It spreads. It actually tastes like dessert. Not the plain ground-up nut stuff. That’ll ruin the whole thing. I learned the hard way so you don’t have to.
Pistachio cream is sweet and spreadable. Kind of like Nutella, but with pistachios. Pistachio butter is just ground nuts. No sugar, no smooth texture. If you use that instead, the filling turns out dry and kind of bitter. Trust me on this. I’ve done it. Once.
Not sure if what you’ve got is cream or butter? I wrote up a guide showing the difference between pistachio butter and cream, so it’s easy to tell. Might save your bar!
The Secret to the Crunch: All About Kataifi
Kataifi’s the stringy stuff. Looks like weird angel hair pasta but it’s actually just shredded phyllo dough. You toast it in butter until it’s golden and crunchy. That’s where the texture comes from.
The texture is everything. It’s what makes this bar feel like more than just another sweet. It holds up against the creamy filling and thick chocolate shell. And it doesn’t go soggy if you do it right.
This special ingredient is key to the texture. To learn more about where to find it and how to handle it, check out my detailed post, What is Kataifi?
The Balancing Act: The Role of Tahini
Now this one gets a few raised eyebrows. Tahini? In a dessert?
Yep.
You don’t taste it right away. But it’s doing work in the background. It cuts the sweetness from the pistachio cream and chocolate. Just a little bitterness, just enough depth. Without it, everything leans too sweet. You need that balance.
People ask if it’s necessary. I think it is.
How to Make Dubai Chocolate Bar (Step-by-Step Visual Guide)
Here’s where it all comes together. You’ve got your filling, your chocolate’s ready, now it’s just about putting it all in the mold without making a mess. Don’t rush it. I’ve done that. The shell cracks or the filling spills over. Just go slow. Be decent to the chocolate. That’s it.
Step 1: Toast the Kataifi to Golden Perfection
Start with this. It’s the foundation. Melt your butter in a nonstick pan, then toss in the chopped kataifi. Keep the heat on medium. Stir often.
What you’re looking for is an even, deep golden brown. The kind that smells nutty and looks like it could go into a baklava. If it’s still pale, it’s not done. And if it’s uneven, some bites will be soft. That crunch doesn’t happen on its own.
Once that kataifi’s looking golden and smelling like butter heaven, take it off the heat. And I mean walk away. Go sip something. Scroll a little. Whatever.
If you dump the filling in while it’s still warm, it goes soggy. Not kinda soggy! Super sad soggy. All that crunch? Gone. You worked too hard for that. Let it cool.
Step 2: Mix it all together
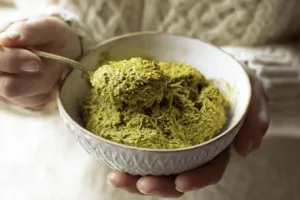
Kataifi’s cool? Good. Throw it in a bowl with the pistachio cream, tahini, and salt. Stir it up. That’s the filling. Done.
Not runny. Not dry. It should hold its shape when you scoop it but still feel soft. That’s the sweet spot.
 2")
Step 3: Prepare the Chocolate Shell (Choose Your Method)
This part depends on how you want the bar to set. You’ve got two paths. Both work, but they give different results.
 3")
Path A: The Professional Method (Tempering Chocolate)
If you want your chocolate to hold up at room temp and break with that nice clean snap, you gotta temper it. It’s not fancy. You’re just melting it, then cooling it down the right way.
Took me a couple tries to get it right, but once you do it once, it’s easy to repeat.
- Melt about two-thirds of your chocolate in a heatproof bowl over a pot of simmering water.
- Melt most of the chocolate, then take it off the heat. Dump in the rest and stir. That’s all. Just stir ’til it melts.
- If you’ve got a thermometer, cool. You want it around 88 to 90°F. That’s about 31 to 32°C.
- If not, no big deal. Dip in a spoon and let it sit. If it firms up and looks smooth, you’re good. If it stays soft or streaky, it’s not there yet. Stir a bit more. That’s it.
Path B: The Quick & Easy Method (No Tempering)
This version is simpler. Just melt your chocolate with a bit of coconut oil, either over a double boiler or in the microwave in short bursts. Stir often.
The coconut oil keeps it smooth and pourable. It won’t set firm at room temp, so you’ll need to store the finished bars in the fridge. That’s the trade-off.
Still tastes good. Just different texture.
Step 4: Assemble and Chill
Now you’re layering.
- Pour about a third of your melted chocolate into the bottom of each mold. Tilt them around to coat the sides too. Then pop them in the fridge until firm.
- Spoon in the filling. Press it down gently so it’s flat and hits the edges.
- Pour the rest of the chocolate over the top. Spread it around. Scrape off anything extra so the bottom’s smooth.
- Stick it in the fridge. Come back in half an hour. If it feels solid, flip the mold and pop it out. The first one’s always the one that makes you hold your breath. If it cracks, eat that one first. That’s the rule.
 4")
The Ultimate Troubleshooting Tips: Common Problems & How to Fix Them
Stuff happens. Chocolate seizes. Bars don’t release. Fillings go soft. Doesn’t mean you messed up. Just means a few things need tweaking. Here’s how to fix the most common issues before they drive you nuts.
Why did my chocolate get thick and grainy (seize)?
This usually means a little water got into the chocolate while it was melting. Even a drop can throw things off. Make sure all your tools are dry. Don’t cover the bowl while melting. And don’t let steam from the double boiler sneak in. If it does seize, you can try adding a bit of warm cream and turning it into ganache. Not what you planned, but still useful.
Why won’t my chocolate bar release from the mold?
Two main reasons. Either the chocolate wasn’t fully set or it wasn’t tempered. Tempered chocolate shrinks just a bit as it cools, which helps it pop out clean. If it’s not tempered, it stays a little soft and sticks. Best bet is to chill it longer and try again gently.
Why isn’t my filling crunchy?
That comes down to the Kataifi. If it wasn’t toasted long enough or cooled properly before mixing, it’ll go soft. Make sure it’s golden all over before you stop cooking. And let it cool all the way before stirring it into the pistachio cream.
Want to see what it looks like? I’ve got photos in my post about Kataifi. Makes it easier if you’ve never used it before.
Why does my homemade bar melt in my hands?
It’s probably not tempered. Tempered chocolate holds up at room temp. The quick method with coconut oil works fine, but the bars need to stay in the fridge. If they’re melting fast, that’s your sign.
 5")
Creative Variations & Storage
Made the bar? Cool. Want to mess with the flavors a bit? Go for it. Just don’t mess with the crunch.
Need to stash it for later? Here’s how to keep it from going weird.
Flavor Variations
Throw some flaky salt on top if you want. I do that a lot. Cuts the sweet, adds a little kick.
Feeling fancy? A bit of cardamom or rosewater in the filling changes the whole vibe. Just a tiny bit. That stuff goes a long way.
And if pistachio’s not your thing (wild, but okay), Biscoff works. Totally different, still good. Just don’t tell me it’s the same bar.
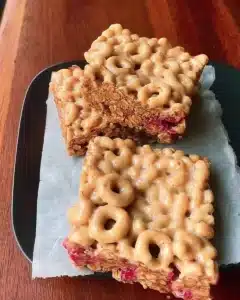
That filling? You can use it in other stuff too. Once you’ve made it once, you’ll start thinking of all kinds of ways to sneak it into other desserts like my Dubai Chocolate Cupcakes, Dubai chocolate Cookies, Dubai chocolate Dates and way more…
How to Store Your Homemade Dubai Chocolate Bar
If you went the tempered chocolate route, you’re good to store these at cool room temperature. Just keep them in an airtight container and out of direct sunlight or heat.
Used the easy method with coconut oil? Keep the bars in the fridge. They’ll hold their shape better. Let ’em sit out for a couple minutes if you want that softer bite.
Freezing? Wrap each one in plastic, toss them in a bag or container, and stash in the freezer. When you’re ready, move one to the fridge first so it doesn’t get all sweaty.
The Ultimate Dubai Chocolate Bar FAQs
If you’ve got questions, you’re not alone. These are the things folks ask most often. I’ve grouped them so they’re easier to scan. No fluff. Just straight answers to help you get it right.
What is the viral Dubai chocolate bar?
It’s a chocolate bar filled with pistachio cream and crunchy kataifi, made famous by Fix Dessert Chocolatier in Dubai. The original name is Can’t Get Knafeh of It, and it was created by Sarah Hamouda. The whole thing is based on knafeh, a traditional dessert that also uses kataifi pastry.
What does the Dubai chocolate bar taste like?
It’s rich. The chocolate shell snaps, the filling is creamy and slightly nutty, and the kataifi brings the crunch. It’s got layers, but they work together.
Why is the Dubai chocolate bar so expensive?
Good ingredients cost more. Pistachio cream especially. It takes time to make and uses a lot of nuts. Chocolate and kataifi aren’t cheap either, especially if you’re using quality stuff.
Can I use pistachio paste instead of pistachio cream?
No. Pistachio paste is just ground nuts. No sugar, no softness. It’ll make the filling dry and bitter. You need pistachio cream, which is sweetened and spreadable.
What is kataifi and where can I find it?
It’s shredded phyllo dough. You’ll usually find it in the freezer section of Mediterranean or Middle Eastern grocery stores. Sometimes even specialty or international aisles in bigger supermarkets.
Is tahini necessary in the filling?
Yes. It adds a nutty depth that keeps the sweetness from taking over. You won’t really taste it, but you’ll notice the difference if it’s not there.
How do I stop my chocolate from melting? Why isn’t it shiny?
That’s all about tempering. Tempered chocolate sets firm, stays shiny, and doesn’t melt as fast in your hands. If your bar feels soft or dull, check out the tempering steps again.
Why did my chocolate stick to the mold?
It either wasn’t fully set or it wasn’t tempered. Tempered chocolate pulls away from the mold as it cools. If it’s not coming out clean, chill it longer and try again.
What can I use if I don’t have a chocolate mold?
A silicone loaf pan works great. You can also use cupcake liners for smaller bars. Just make sure whatever you use is flexible enough to pop the chocolate out once it sets.
How should I store homemade Dubai chocolate bars?
Tempered bars can sit at cool room temperature, in an airtight container. Non-tempered bars need to stay in the fridge or they’ll go soft.
Can you freeze Dubai chocolate bars?
Just wrap each one in plastic, toss ’em in a container, and stick it in the freezer. When you want one, move it to the fridge for a bit. Keeps the chocolate from going all sweaty.
Let Me Know How Yours Turned Out
That’s the whole thing. Messy counters, chocolate fingers, the whole ride. Hope it turns out as good for you as it does in my kitchen.
If you try it, I’d love to see it. Tag me on Facebook or drop it on Pinterest. Always makes my day to see what you’re cooking.
And if you cracked the first one pulling it out of the mold? Eat it standing over the sink. That’s tradition.
 6")
Foolproof Dubai Chocolate Bar Recipe
Ingredients
Method
- Melt butter in a nonstick pan over medium heat. Add chopped kataifi and toast until deeply golden and nutty-smelling. Let cool completely.
- In a bowl, mix cooled kataifi with pistachio cream, tahini, and a pinch of salt. Stir until combined and scoopable.
- Melt your chocolate: either temper it for a shiny, snappy finish, or melt with coconut oil for a simpler method that requires refrigeration.
- Pour about one-third of the melted chocolate into each mold. Tilt to coat sides and chill until firm.
- Spoon in the filling, pressing gently to flatten and reach the edges.
- Cover with remaining melted chocolate, smooth the bottom, and refrigerate for at least 30–45 minutes until fully set.
- Once firm, unmold the bars. If using tempered chocolate, they can be stored at room temperature. Otherwise, keep them refrigerated.
Nutrition
Notes
- Let the toasted kataifi cool completely before mixing to preserve the crunch.
- Tempered chocolate allows room temperature storage and a snappier finish, while the coconut oil version is easier but must be kept chilled.
- These bars also freeze well! Wrap tightly and thaw in the fridge before serving.