I remember a rainy afternoon when I whipped up these Rocky Road Cookies after one of those days where nothing felt right. Picture this: I spilled flour all over the counter, my dog was barking at the thunder, and my kid was convinced the homework was completely optional.
But as the sweet aroma filled the kitchen, all my worries faded away. It was just me, the warm, gooey chocolate, and the nostalgia of childhood comforts swirling together. These cookies?
They’re not just snacks; they’re little pockets of joy and a reminder that sometimes, the simplest things can turn your day around—SO GOOD, right?
Let’s dive into what makes these cookies a must-bake. Seriously, ME? OBSESSED!
Why You’ll Love This Recipe
- Quick & Easy: Ready in under 30 minutes!
- Budget Friendly: Simple ingredients that won’t break the bank.
- Crowd-Pleaser: Great for bake sales, parties, or just a cozy night in.
- Freezer Friendly: Bake now, freeze for later—perfect for emergencies!
- Comfort Food: Each bite takes you back to simpler times.
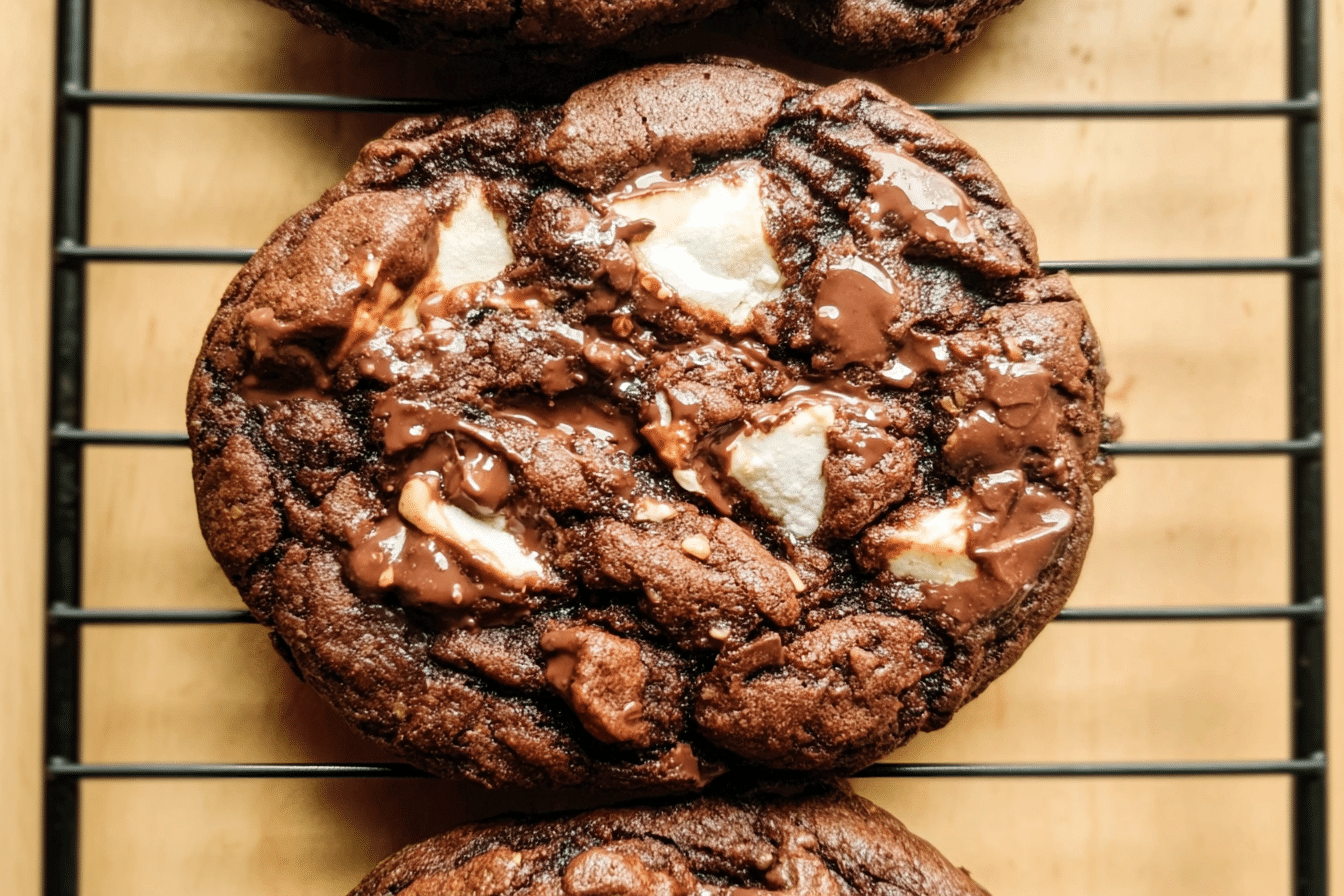
What sets these Rocky Road Cookies apart from typical recipes? While most go straight for the chocolate overload, I’ve added mini marshmallows and sliced almonds to give you that classic Rocky Road vibe — UNREAL.

Ingredients Needed
Base Ingredients
- 1/2 cup butter (softened, so it creams quicker)
- 3/4 cup brown sugar (packed, for that rich caramel taste)
- 1/4 cup granulated sugar (the perfect balance)
- 1 teaspoon vanilla extract (always go for pure)
- 1 large egg (for moisture and binding)
Dry Ingredients
- 1 ⅓ cups all-purpose flour (but measure right—no one likes crumbly cookies!)
- 1/3 cup unsweetened cocoa powder (the magic dust)
- 1/2 teaspoon baking soda (makes them puffy)
- 1/4 teaspoon salt (enhances all those sweet flavors)
Mix-Ins
- ½ cup semisweet chocolate chips (because there can never be too much chocolate)
- 1 cup halved mini marshmallows (for that chewy marshmallow joy)
- ¼ cup sliced almonds (adds a nice crunch)
How to Make This Recipe
Step 1: Preheat the Oven
Preheat your oven to 350°F. Line two baking sheets with parchment paper or silicone mats—this will save you a ton of clean-up later.
Step 2: Melt the Butter
Grab a large, microwave-safe bowl and throw in that 1/2 cup of butter. Microwave it for about 40 seconds until it’s mostly melted, then whisk it until it’s all liquefied and looking glossy—this is where the magic begins.
Step 3: Incorporate Sugars
Add the 3/4 cup brown sugar and 1/4 cup granulated sugar into the bowl. Mix them up well—this step is crucial for achieving that chewy texture. You want it combined and slightly fluffy.
Step 4: Bring in the Wet Ingredients
Now, stir in 1 teaspoon of vanilla extract and 1 large egg. Mix until fully incorporated. This is the moment you’ll start to feel that comforting aroma take shape!
Step 5: Combine the Dry Ingredients
In goes the 1 ⅓ cups of flour, 1/3 cup cocoa powder, 1/2 teaspoon baking soda, and 1/4 teaspoon salt. Make sure to measure your flour properly—nobody likes dry cookies!
Combine until the dough just comes together—it should be soft and a tad sticky. Don’t overmix, or you’ll lose that perfect texture!
Step 6: Stir in the Goodies
Gently fold in your ½ cup chocolate chips, 1 cup mini marshmallows, and ¼ cup sliced almonds. You’ll want them evenly distributed through the dough—every bite deserves a surprise.
Step 7: Bake the Cookies
Using a medium cookie scoop, scoop out 1.5 tablespoons of dough and place them about two inches apart on your baking sheets. Bake for 7-10 minutes. They should look puffy but still a tiny bit underbaked in the center. Trust me on this—undercooked equals gooey goodness!
How to Store It & Expert Tips
How to Store It
Once cooled, store your cookies in an airtight container at room temperature for 3-5 days. Got extra? Pop those bad boys in the freezer—freeze them solid! When you’re ready for a treat, just let them thaw and they’ll taste as fresh as day one.
Expert Tips
- Cookie Scoop: Invest in a good medium cookie scoop for uniformity—perfectly shaped cookies are more fun to eat!
- Flavor Boosters: Want a kick? Add a pinch of cinnamon or a splash of espresso powder to the dough.
- Customize: Swap the almonds for pecans or even walnuts if you want to mix it up!
Conclusion
These Rocky Road Cookies are a love letter to comfort and nostalgia, perfect for any occasion. They’re easy, forgiving, and most importantly, they WORK. Plus, who can resist that melty chocolate and gooey marshmallow combination? If you’ve tried this, give me a star rating and drop a comment below.
And hey, share it with your cousin who never shows up empty-handed. Did you add your own spin? I wanna hear it!
FAQ Section
Q: Can I use different nuts in this recipe?
Here’s the deal: Absolutely! Use whatever you’ve got on hand—walnuts or pecans work just fine.
Q: How do I make these cookies thicker?
Real talk: Chill the dough for about 30 minutes before baking. It helps the cookies hold their shape better.
Q: Can I make these without cocoa powder?
For sure! Just trade it in for more flour and add some fun flavorings like peanut butter or white chocolate.
Feeling inspired? If your sweet tooth isn’t done yet, my Dubai Chocolate Brownies are absolute chaos in the best way. Happy baking!