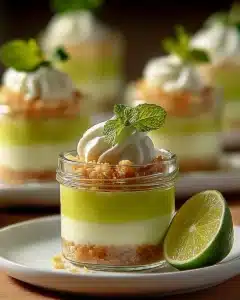
A Sweet Escape: My Key Lime Pie Mini Desserts
You know those summer days when the sun is blazing, and you just wanna kick back with something cool and refreshing? I whipped up these Key Lime Pie Mini Desserts on a day like that, while my dog, Buddy, chased the shadows across the backyard and my kids debated which superhero had the best powers. Right when I took my first bite, I swear time stood still. The tangy key lime, creamy filling, and crunchy graham cracker crust made everything else fade away. It was SO GOOD, I had to share the recipe! Trust me; these little shooters are not just a treat—they’re a slice of nostalgia in a glass. And guess what? They’re as easy as pie—without the crazy calories. Let’s dive in!
WHY YOU’LL LOVE THIS RECIPE
- Quick: From prep to plate, you’re looking at just about 30 minutes of hands-on time.
- Budget-Friendly: Uses simple ingredients that won’t break the bank.
- Freezer Friendly: Make a batch and pop them in the freezer for later.
- Kid-Approved: A sure crowd-pleaser at family gatherings.
- Two-Tone Fun: Who doesn’t love a little pizzazz with those green and white layers?
Unlike your traditional key lime pie, these mini desserts are portion-controlled and oh-so-presentable, making them perfect for parties or a fancy dinner with friends.
INGREDIENTS NEEDED AND HOW TO MAKE IT
Ingredients Needed
-
For the crust:
- Graham cracker crumbs
- Melted butter (softened for easy mixing)
- A touch of white sugar for sweetness
-
For the filling:
- Reduced-fat cream cheese
- Low-fat vanilla Greek yogurt
- Fat-free sweetened condensed milk
- Key lime juice
- Optional: a drop of green food coloring for flair
How to Make This Recipe?
Step 1: Preparing the Crust
First up, let’s make that crust sing! In a small bowl, grab those graham cracker crumbs, pour in the melted butter, and sprinkle in a little sugar. Mix it up until everything’s nice and combined. Then take about a tablespoon of this crusty goodness and add it to the bottom of each 2-ounce shooter glass. Press it down lightly to form a neat and tasty crust. Don’t skip this part—it gives that satisfying crunch!
Step 2: Mixing the Creamy Filling
Now, let’s get creamy! In a medium bowl, use your electric mixer to beat the reduced-fat cream cheese and low-fat vanilla Greek yogurt together until it’s smooth, like a cloud on a sunny day. In another bowl, mix the sweetened condensed milk with key lime juice until well combined. Then, add this zesty blend into the cream cheese mixture and beat again until everything is blended smoothly. It should be rich and luscious—pure magic!
Step 3: Assembling the Mini Desserts
Here comes the fun part. Divide this delightful mixture in half. If you wanna get fancy, add a drop of green food coloring to one half to create that eye-catching two-tone effect. Using a piping bag (or a zip-top bag with the corner snipped off), pipe the white mixture halfway up the shooter glasses. Tap them down gently to level that creamy filling. Next, repeat the process with the green mixture, topping it off for a gorgeous layered look.
Step 4: Chilling and Garnishing
Now, it’s chill time! Place your mini desserts in the fridge for at least 30 minutes to set. Once they’re cool and firm, let’s garnish them with a dollop of whipped cream, some zesty lime zest, and a sprinkle of those extra graham cracker crumbs. Adding these little touches amps up the presentation—your guests will be impressed, and they’re pretty simple!
HOW TO STORE IT & EXPERT TIPS
How to Store It
Store these mini delights in your fridge for up to a week. Want to save them for later? You can freeze them! Just make sure to cover them tightly with plastic wrap or transfer to an airtight container. When you’re ready to dig in, let them thaw in the fridge overnight. Voila!
Expert Tips
- For extra flavor: Toss in a little lime zest to the filling for a more intense citrus kick.
- Save time: If you don’t have a piping bag, a zip-top bag will do the trick, just snip off a corner.
- Pantry subs: If you don’t have reduced-fat cream cheese, regular works too; just keep an eye on those calories if you’re counting!
CONCLUSION
So there you have it—my Key Lime Pie Mini Desserts that are just bursting with flavor and nostalgia! These little beauties are the perfect blend of tangy, creamy, and crunchy, making them ideal for any occasion. They work because they bring a bit of sunshine to the table, reminding us of summer days spent with family and friends.
If you loved this recipe, give it a star rating and drop a comment! Share it with your cousin who never shows up empty-handed. And I’m curious—did you add your own spin? I wanna hear it!
FAQ SECTION
Q: Can I make these ahead of time?
Here’s the deal: Absolutely! These mini desserts can be made a day ahead. Just store them in the fridge until you’re ready to serve.
Q: What can I use instead of key lime juice?
Real talk—if you can’t find key lime juice, regular lime juice works just fine. The taste will still be zesty and delicious!
Q: Can these be made gluten-free?
For sure! Just swap out the regular graham cracker crumbs for gluten-free ones, and you’re all set to enjoy these decadent treats without any worries.
If your sweet tooth isn’t done yet, my Chocolate Chip Cookie Dough Bites are the perfect follow-up for those sugar cravings.
Key Lime Pie Mini Desserts
Ingredients
Method
- In a small bowl, mix graham cracker crumbs, melted butter, and sugar until combined. Press about 1 tablespoon of the mixture into the bottom of each 2-ounce shooter glass.
- In a medium bowl, beat cream cheese and yogurt together until smooth. In another bowl, mix sweetened condensed milk with key lime juice, then combine with the cream cheese mixture until smooth.
- Divide the creamy mixture in half and add green food coloring to one half. Use piping bags to layer the mixtures into the shooter glasses.
- Refrigerate for at least 30 minutes to set. Garnish with whipped cream, lime zest, and graham cracker crumbs before serving.