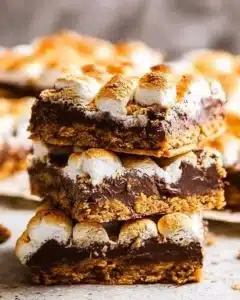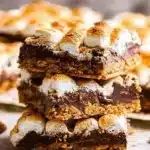
Step Up Your Snack Game with These Adorable S’more Bars
You know those days when life’s a little too chaotic, but you still want to whip up something that feels like a hug? I remember a particular afternoon when I tried to bake a fancy dessert, but my kid decided to spill juice all over his math homework. So, there I was, trying to salvage both the snack and the homework, and out of sheer desperation, I threw together these S’more Bars. I’m telling you, they turned out SO GOOD that even the dog wanted in on the action. Ever since, they’ve been a staple in our house! Easy, quick, and downright addictive, these bars will have you reminiscing about warm campfire nights, even if you’re just hanging out in your living room.
Why You’ll Love This Recipe
- Quick: Ready in just about 15 minutes (plus cooling time).
- Budget-Friendly: Most ingredients are pantry staples!
- Crowd-Pleaser: Kids and adults alike are ME? OBSESSED?
- Nostalgic: Reminds you of summers spent by the fire.
- Flexible: You can throw in whatever toppings you have on hand!
So, ditch the complicated recipes and let’s dive into something that feels like home.
Ingredients Needed
For the Base
- Graham Crackers: The crunchy foundation for that classic s’mores flavor.
- Butter: 1/2 cup, melted—this helps everything stick together and adds richness.
For the Topping
- Chocolate Chips: 1 cup of your favorite variety (dark, milk, or even caramel if you’re feeling adventurous).
- Marshmallows: 2 cups, mini or regular, depending on how gooey you want it.
How to Make This Recipe?
Step 1: Preheat the Oven
Set your oven to 350°F (175°C) and let it warm up. Trust me, this is the perfect temperature for golden, toasted marshmallows!
Step 2: The Base Layers
Grab an 8×8 baking dish and layer those graham crackers right at the bottom. It’s a game-changer for that nice crunch and classic s’mores vibe.
Step 3: Butter Time
Melt that butter in the microwave or on the stovetop. Give it a little 30-second burst, or until it’s all gooey. Pour it over your graham crackers, making sure to coat them evenly. This is where the flavor magic starts, folks.
Step 4: Chocolate Dreams
Sprinkle a generous layer of chocolate chips over the buttered graham crackers. Get wild and mix in some peanut butter chips if you want to mix things up!
Step 5: Marshmallow Magic
Now for the marshmallows! Go big or go home with a thick layer on top of the chocolate chips. The more, the merrier!
Step 6: Bake Away
Stick that dish in the preheated oven for about 10-12 minutes. Keep an eye on them—the goal is for those marshmallows to puff up and turn a golden brown. Your kitchen will smell UNREAL!
Step 7: Cool and Slice
Once out of the oven, allow the bars to cool for a few minutes before you slice them into squares. They’re gonna be super gooey, so be patient before diving in!
How to Store It & Expert Tips
How to Store It
Store your S’more Bars in an airtight container at room temperature for 3-4 days. If you want to keep them longer, you can stash them in the freezer for up to a month. Just reheat in the microwave for a few seconds for that fresh-out-of-the-oven experience.
Expert Tips
- Use Parchment Paper: Line your baking dish with it before adding graham crackers for easy cleanup.
- Add Sprinkles: If you’ve got kids, throw some sprinkles on top before baking for an extra fun touch!
- Flavor Boost: A dash of sea salt on the marshmallows just before baking can elevate the flavors to a whole new level.
Conclusion
That’s it! These S’more Bars are the perfect mix of cozy nostalgia and ease. They’ll be the go-to recipe for gathering friends and family around, remember life’s simple pleasures. If you’re as hooked as I am, leave a star rating and drop some comments! And, hey, share it with your cousin who never shows up empty-handed. Did you add your own spin? I wanna hear it!
FAQ Section
Q: Can I use different types of chocolate?
Real talk—absolutely! Dark, milk, or even white chocolate works like a charm here. Use what you love!
Q: Can I add peanut butter?
For sure! Swirl in some peanut butter before you add the marshmallows. It’s a game changer!
Q: How long do these bars last?
These bars will stay good for about 3-4 days at room temp or up to a month in the freezer. But let’s be real; they probably won’t last that long!
If your sweet tooth isn’t done yet, my Coconut Macaroons are an absolute treat worth trying next! Their chewy goodness is unreal.
S'more Bars
Ingredients
Method
- Preheat the oven to 350°F (175°C).
- Layer graham crackers in an 8x8 baking dish.
- Melt the butter and pour it over the graham crackers, coating evenly.
- Sprinkle chocolate chips over the buttered graham crackers.
- Add a thick layer of marshmallows on top of the chocolate chips.
- Bake in the preheated oven for 10-12 minutes, watching for golden browned marshmallows.
- Cool for a few minutes before slicing into squares.